Authentication and authorization
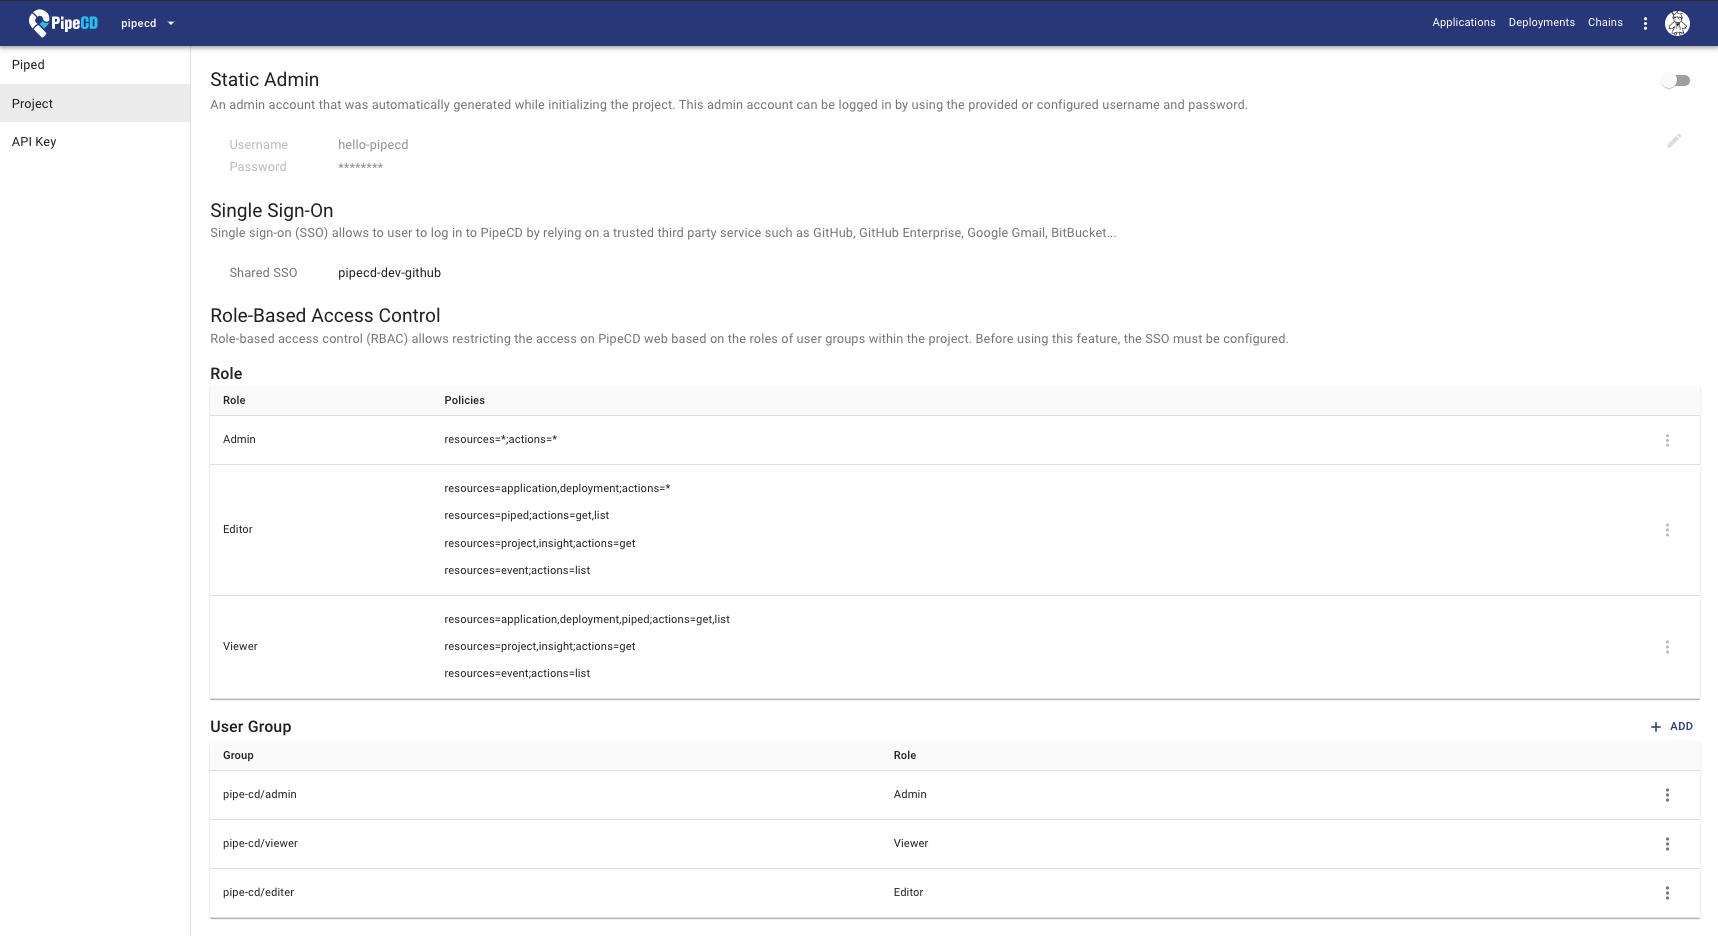
Static Admin
When the PipeCD owner adds a new project, an admin account will be automatically generated for the project. After that, PipeCD owner sends that static admin information including username, password strings to the project admin, who can use that information to log in to PipeCD web with the admin role.
After logging, the project admin should change the provided username and password. Or disable the static admin account after configuring the single sign-on for the project.
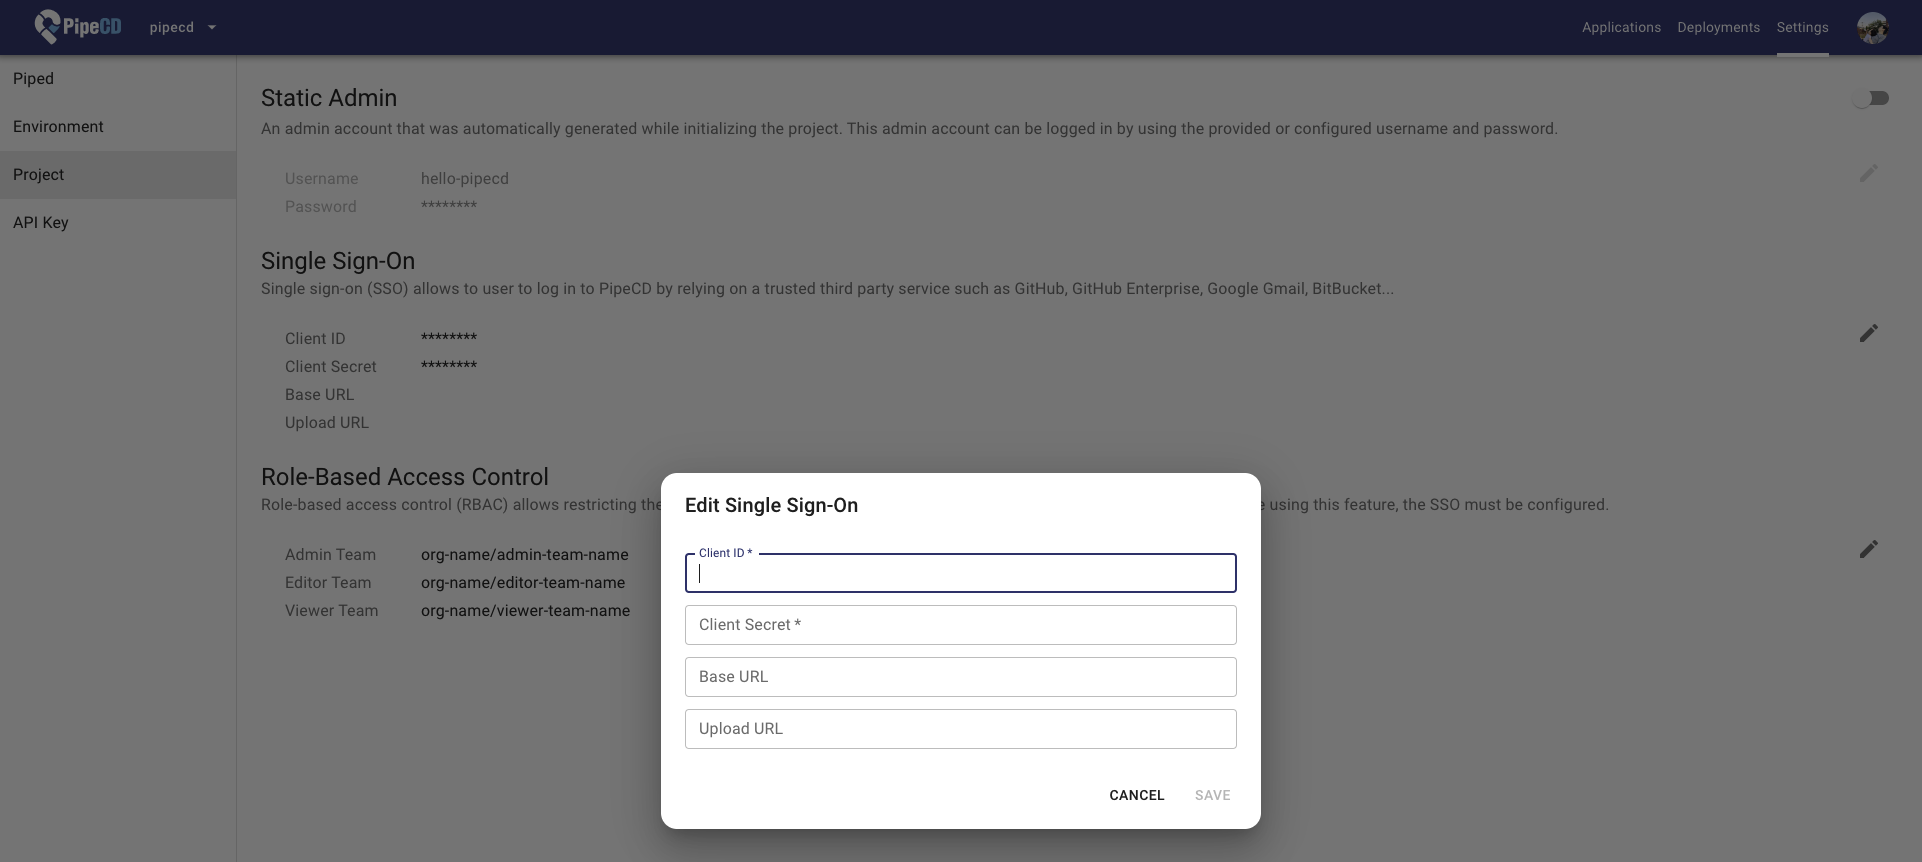
Single Sign-On (SSO)
Single sign-on (SSO) allows users to log in to PipeCD by relying on a trusted third-party service.
The project can be configured to use a shared SSO configuration (shared OAuth application) instead of needing a new one. In that case, while creating the project, the PipeCD owner specifies the name of the shared SSO configuration should be used, and then the project admin can skip configuring SSO at the settings page.
Supported service
- GitHub
- Generic OIDC
Note: In the future, we want to support such as Google Gmail, Bitbucket…
Github
Before configuring the SSO, you need an OAuth application of the using service. For example, GitHub SSO requires creating a GitHub OAuth application as described in this page:
https://docs.github.com/en/developers/apps/creating-an-oauth-app
The authorization callback URL should be https://YOUR_PIPECD_ADDRESS/auth/callback.
Generic OIDC
PipeCD supports any OIDC provider, with tested providers including Keycloak, Auth0, and AWS Cognito. The only supported authentication flow currently is the Authorization Code Grant.
Requirements and Troubleshooting:
-
The OIDC provider must provide claims for user’s roles and username.
-
Roles claim value must use the same values as pre-configured project RBAC Roles.
-
Claims can be retrieved from the IdToken or UserInfo endpoint. The UserInfo endpoint will be used if the issuer supports it.
-
You can use set a custom claim key name for roles and username in the OIDC provider. Using
usernameClaimKeyandrolesClaimKeyin the configuration. If not set, the default value will be chosen in the following order:- Supported Claims Key for Username (in order of priority):
username,preferred_username,name,cognito:username - Supported Claims Key for Role (in order of priority):
groups,roles,cognito:groups,custom:roles,custom:groups
- Supported Claims Key for Username (in order of priority):
-
If no usable claims are found,
Unable to find usererror will be shown. -
If no roles are found, user can not access any resources. (If
allowStrayAsVieweris set totrue, user can access as a viewer)
Provider Configuration Examples:
Keycloak
-
Client authentication: On
-
Valid redirect URIs:
https://YOUR_PIPECD_ADDRESS/auth/callback -
Client scopes: Add a new mapper to the
<client-id>-dedicatedscope. For instance, map Group Membership information to the groups claim (Full group path should be off). -
Control Plane configuration:
apiVersion: "pipecd.dev/v1beta1"
kind: ControlPlane
spec:
  sharedSSOConfigs:
    - name: oidc
      provider: OIDC
      oidc:
        clientId: <CLIENT_ID>
        clientSecret: <CLIENT_SECRET>
        issuer: https://<KEYCLOAK_ADDRESS>/realms/<REALM>
        redirectUri: https://<PIPECD_ADDRESS>/auth/callback
        scopes:
          - openid
          - profile
Okta
-
Allowed Callback URLs:
https://YOUR_PIPECD_ADDRESS/auth/callback -
Control Plane configuration:
apiVersion: "pipecd.dev/v1beta1"
kind: ControlPlane
spec:
  sharedSSOConfigs:
    - name: oidc
      provider: OIDC
      oidc:
        clientId: <CLIENT_ID>
        clientSecret: <CLIENT_SECRET>
        issuer: https://<OKTA_ID>.okta.com
        redirectUri: https://<PIPECD_ADDRESS>/auth/callback
        scopes:
          - openid
          - profile
          - groups
Auth0
-
Allowed Callback URLs:
https://YOUR_PIPECD_ADDRESS/auth/callback -
Control Plane configuration:
apiVersion: "pipecd.dev/v1beta1" kind: ControlPlane spec: sharedSSOConfigs: - name: oidc provider: OIDC oidc: clientId: <CLIENT_ID> clientSecret: <CLIENT_SECRET> issuer: https://<AUTH0_ADDRESS> redirectUri: https://<PIPECD_ADDRESS>/auth/callback scopes: - openid - profile -
Roles/Groups Claims For Role or Groups information mapping using Auth0 Actions, here is an example for setting
custom:roles:exports.onExecutePostLogin = async (event, api) => { let namespace = "custom"; if (namespace && !namespace.endsWith("/")) { namespace += ":"; } api.idToken.setCustomClaim(namespace + "roles", event.authorization.roles); };
AWS Cognito
-
Allowed Callback URLs:
https://YOUR_PIPECD_ADDRESS/auth/callback -
Control Plane configuration:
apiVersion: "pipecd.dev/v1beta1"
kind: ControlPlane
spec:
  sharedSSOConfigs:
    - name: oidc
      provider: OIDC
      oidc:
        clientId: <CLIENT_ID>
        clientSecret: <CLIENT_SECRET>
        issuer: https://cognito-idp.<AWS_REGION>.amazonaws.com/<USER_POOL_ID>
        redirectUri: https://<PIPECD_ADDRESS>/auth/callback
        scopes:
          - openid
          - profile
Custom Claims Key
In some cases, the OIDC provider may not provide the claims with the default key names like groups. You can set the custom claim key name for roles and username in the control plane configuration to map the claims from the OIDC provider. To be cautious, OIDC providers can not be used if issuer discovery is not supported.
apiVersion: "pipecd.dev/v1beta1"
kind: ControlPlane
spec:
  sharedSSOConfigs:
    - name: oidc
      provider: OIDC
      oidc:
        clientId: <CLIENT_ID>
        clientSecret: <CLIENT_SECRET>
        issuer: https://<OIDC_ADDRESS>
        redirectUri: https://<PIPECD_ADDRESS>/auth/callback
        scopes:
          - openid
          - profile
        usernameClaimKey: username # change to your custom claim key
        rolesClaimKey: roles # change to your custom claim key
        avatarUrlClaimKey: picture # change to your custom claim key
(Optional) You can choose to use the avatar URL from the OIDC provider. Using avatarUrlClaimKey in the configuration. If not set, the default value will be chosen in the following order: picture, avatar_url
Custom OIDC Configuration
If you want to set your custom endpoint without using the endpoint from the issuer, you can set the authorization_endpoint, token_endpoint, userinfo_endpoint in the control plane configuration.
apiVersion: "pipecd.dev/v1beta1"
kind: ControlPlane
spec:
  sharedSSOConfigs:
    - name: oidc
      provider: OIDC
      oidc:
        clientId: <CLIENT_ID>
        clientSecret: <CLIENT_SECRET>
        issuer: https://<OIDC_ADDRESS>
        redirectUri: https://<PIPECD_ADDRESS>/auth/callback
        scopes:
          - openid
          - profile
        authorization_endpoint: https://<OIDC_ADDRESS>/authorize # change to your custom endpoint
        token_endpoint: https://<OIDC_ADDRESS>/token # change to your custom endpoint
        userinfo_endpoint: https://<OIDC_ADDRESS>/userinfo # change to your custom endpoint
Role-Based Access Control (RBAC)
Role-based access control (RBAC) allows restricting access on the PipeCD web-based on the roles of user groups within the project. Before using this feature, the SSO must be configured.
PipeCD provides three built-in roles:
Viewer: has only permissions to view existing resources or data.Editor: has all viewer permissions, plus permissions for actions that modify state, such as manually syncing application, canceling deployment…Admin: has all editor permissions, plus permissions for updating project configurations.
Configuring the PipeCD’s roles
The below table represents PipeCD’s resources with actions on those resources.
| resource | get | list | create | update | delete |
|---|---|---|---|---|---|
| application | ○ | ○ | ○ | ○ | ○ |
| deployment | ○ | ○ | ○ | ||
| event | ○ | ||||
| piped | ○ | ○ | ○ | ○ | |
| project | ○ | ○ | |||
| apiKey | ○ | ○ | ○ | ||
| insight | ○ |
Each role is defined as a combination of multiple policies under this format.
resources=RESOURCE_NAMES;actions=ACTION_NAMES
The * represents all resources and all actions for a resource.
resources=*;actions=ACTION_NAMES
resources=RESOURCE_NAMES;actions=*
resources=*;actions=*
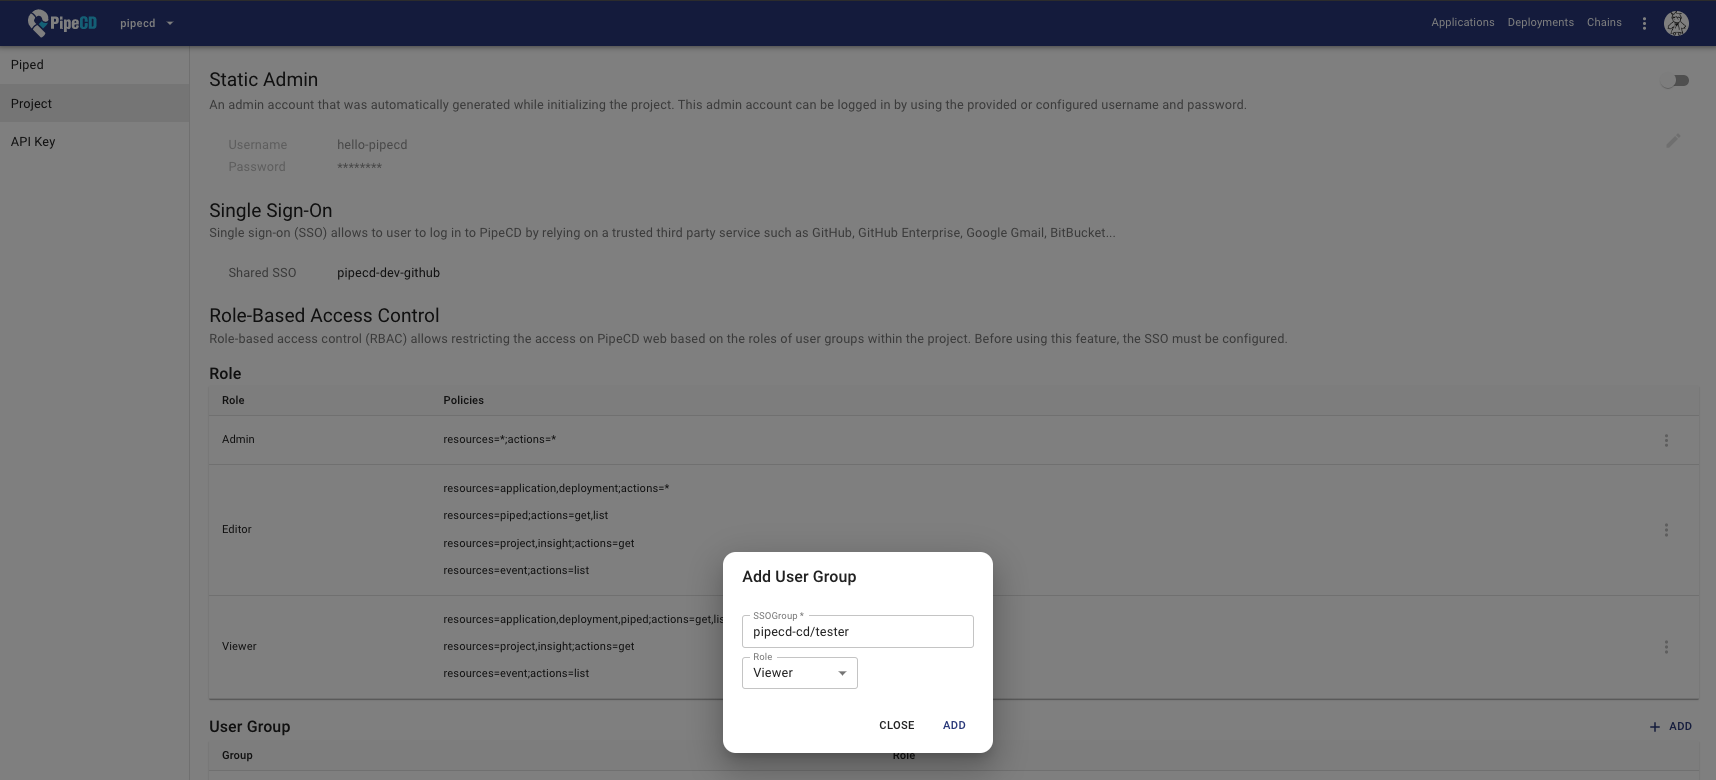
Configuring the PipeCD’s user groups
User Group represents a relation with a specific team (GitHub)/group (Google) and an arbitrary role. All users belong to a team/group will have all permissions of that team/group.
In case of using the GitHub team as a PipeCD user group, the PipeCD user group must be set in lowercase. For example, if your GitHub team is named ORG/ABC-TEAM, the PipeCD user group would be set as ORG/abc-team. (It’s follow the GitHub team URL as github.com/orgs/{organization-name}/teams/{TEAM-NAME})
Note: You CANNOT assign multiple roles to a team/group, should create a new role with suitable permissions instead.
Feedback
Was this page helpful?
Glad to hear it! Please tell us how we can improve.
Sorry to hear that. Please tell us how we can improve.