Adding an application
An application is a collection of resources and configurations that are managed together.
It represents the service which you are going to deploy. With PipeCD, all application’s manifests and its application configuration (app.pipecd.yaml) must be committed into a directory of a Git repository. That directory is called as application directory.
Each application can be handled by one and only one piped. Currently, PipeCD is supporting 5 kinds of application: Kubernetes, Terraform, CloudRun, Lambda, ECS.
Before deploying an application, it must be registered to help PipeCD knows
- where the application configuration is placed
- which
pipedshould handle it and which platform the application should be deployed to
Through the web console, you can register a new application in one of the following ways:
- Picking from a list of unused apps suggested by Pipeds while scanning Git repositories (Recommended)
- Manually configuring application information
(If you prefer to use pipectl command-line tool, see its usage for the details.)
Picking from a list of unused apps suggested by Pipeds
You have to prepare a configuration file which contains your application configuration and store that file in the Git repository which your Piped is watching first to enable adding a new application this way.
The application configuration file name must be suffixed by .pipecd.yaml because Piped periodically checks for files with this suffix.
# For application's configuration in detail for KubernetesApp, please visit
# https://pipecd.dev/docs/user-guide/managing-application/defining-app-configuration/kubernetes/

apiVersion: pipecd.dev/v1beta1
kind: KubernetesApp
spec:
  name: foo
  labels:
    team: bar
# For application's configuration in detail for TerraformApp, please visit
# https://pipecd.dev/docs/user-guide/managing-application/defining-app-configuration/terraform/
apiVersion: pipecd.dev/v1beta1
kind: TerraformApp
spec:
name: foo
labels:
team: bar# For application's configuration in detail for LambdaApp, please visit
# https://pipecd.dev/docs/user-guide/managing-application/defining-app-configuration/lambda/
apiVersion: pipecd.dev/v1beta1
kind: LambdaApp
spec:
name: foo
labels:
team: bar# For application's configuration in detail for CloudRunApp, please visit
# https://pipecd.dev/docs/user-guide/managing-application/defining-app-configuration/cloudrun/
apiVersion: pipecd.dev/v1beta1
kind: CloudRunApp
spec:
name: foo
labels:
team: bar# For application's configuration in detail for ECSApp, please visit
# https://pipecd.dev/docs/user-guide/managing-application/defining-app-configuration/ecs/
apiVersion: pipecd.dev/v1beta1
kind: ECSApp
spec:
name: foo
labels:
team: barTo define your application deployment pipeline which contains the guideline to show Piped how to deploy your application, please visit Defining app configuration.
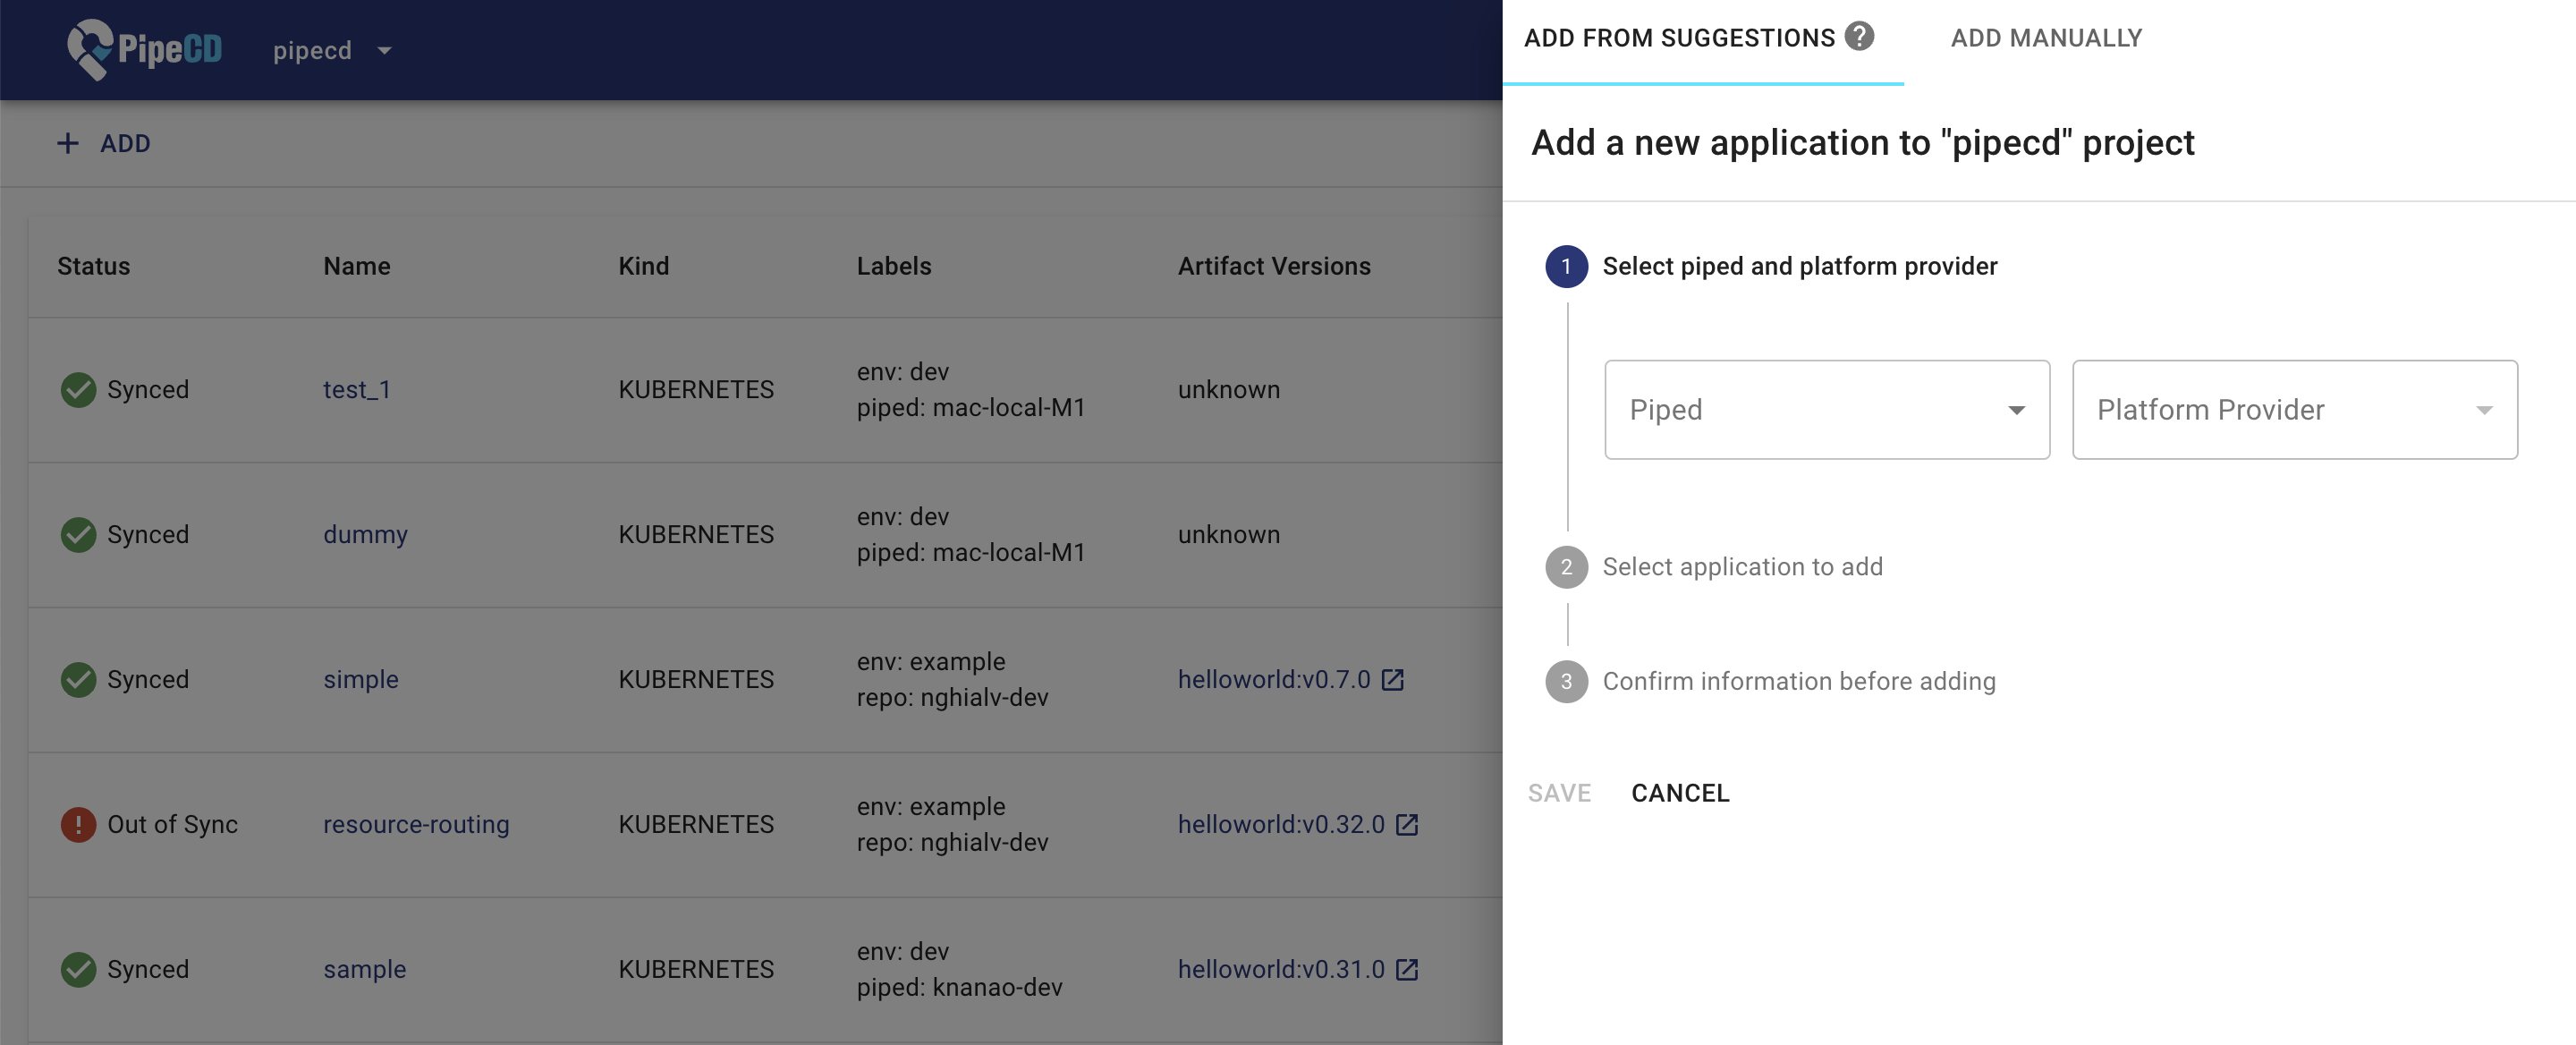
Go to the PipeCD web console on application list page, click the +ADD button at the top left corner of the application list page and then go to the ADD FROM GIT tab.
Select the Piped and Platform Provider that you deploy to, once the Piped that’s watching your Git repository catches the new unregistered application configuration file, it will be listed up in this panel. Click ADD to complete the registration.
Manually configuring application information
This way, you can postpone the preparation for your application’s configuration after submitting all the necessary information about your app on the web console.
By clicking on +ADD button at the application list page, a popup will be revealed from the right side as below:
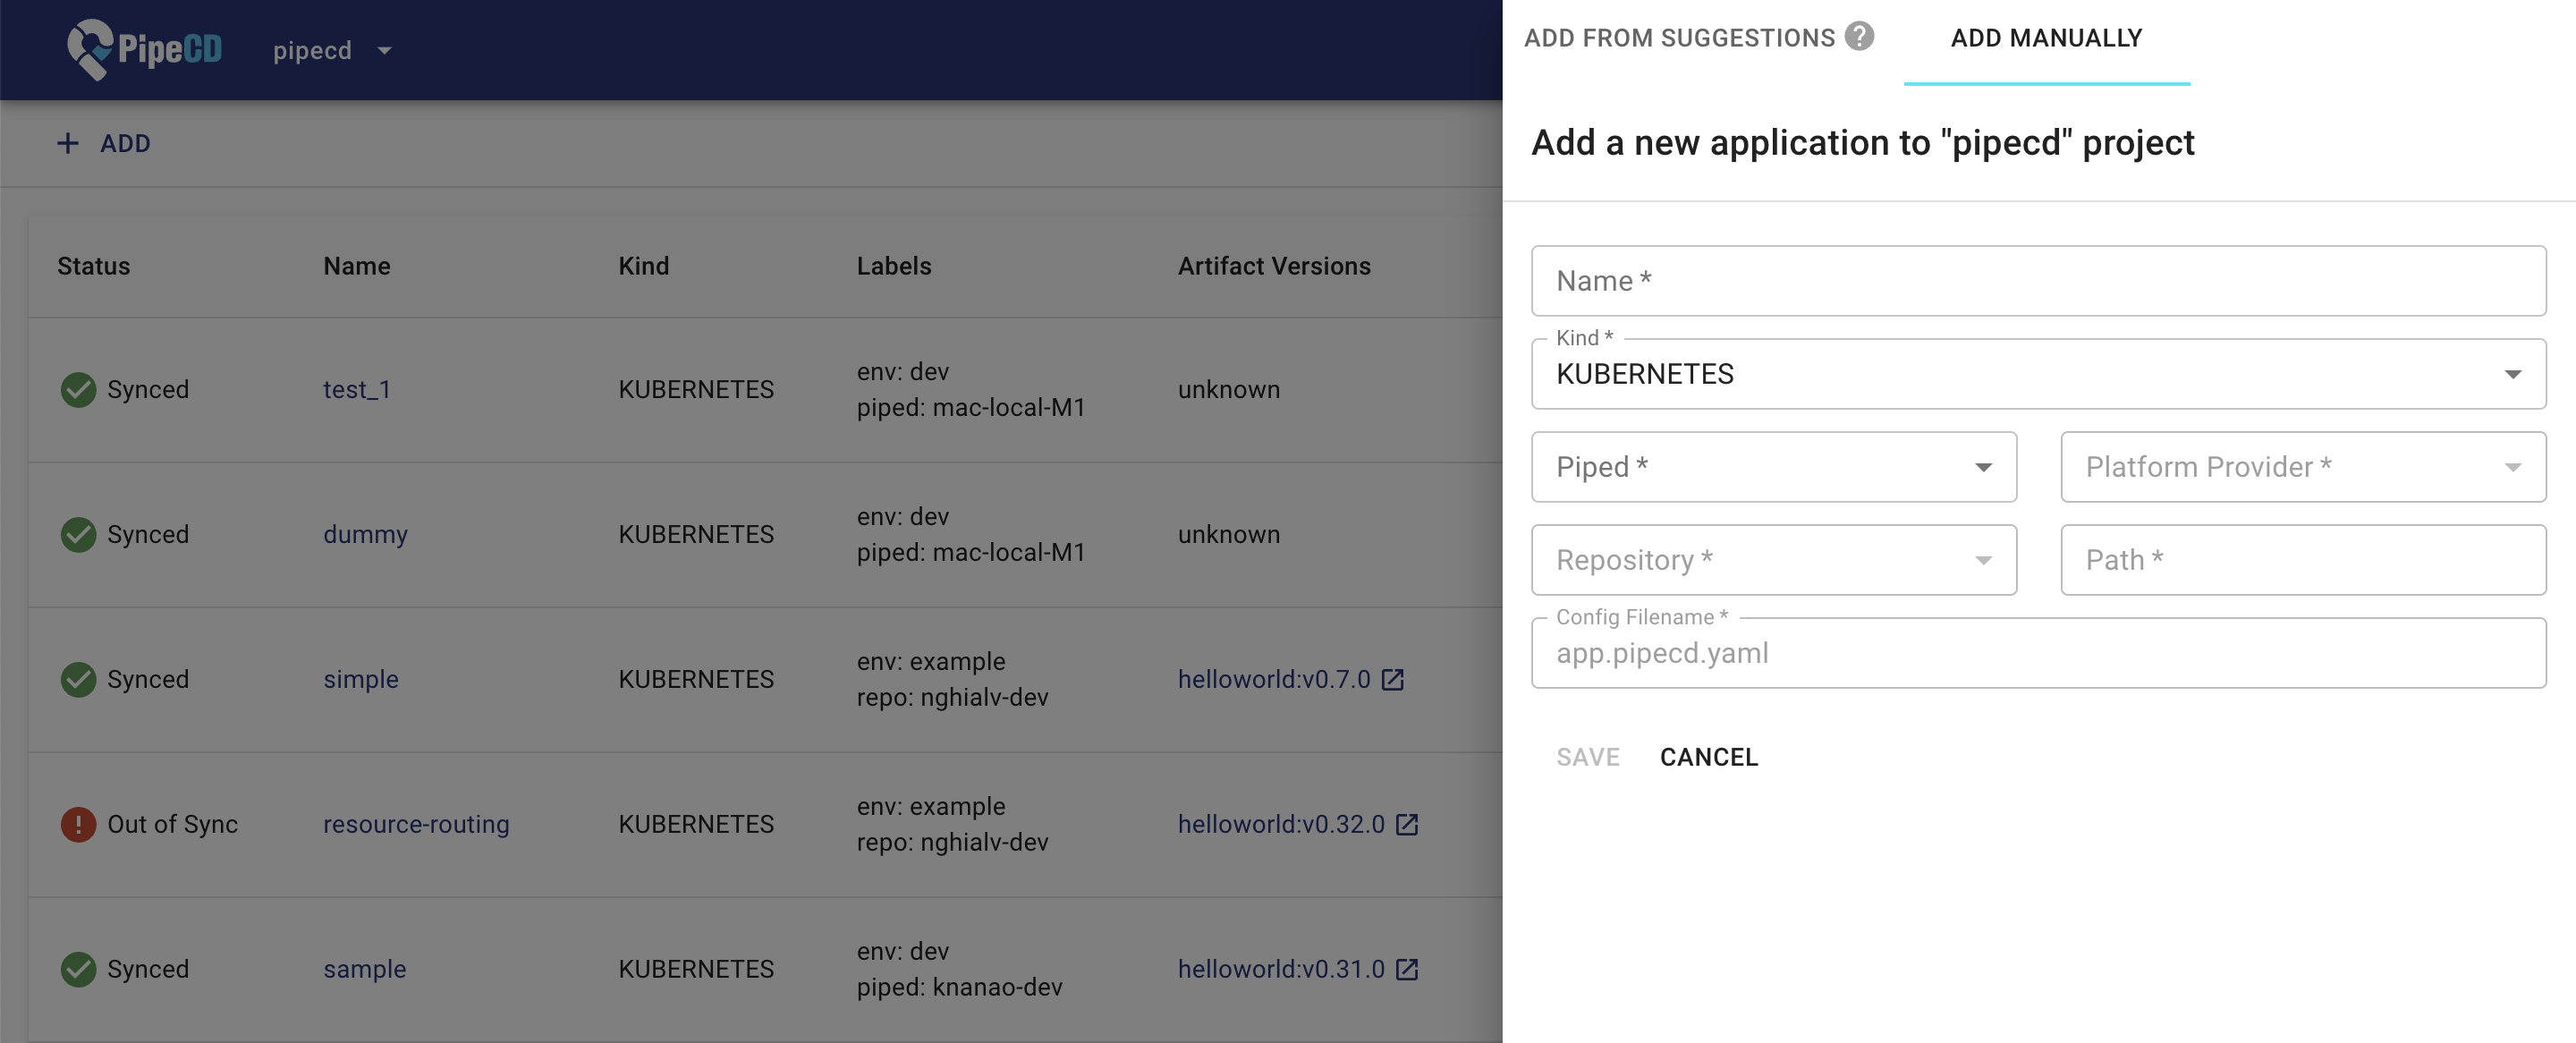
After filling all the required fields, click Save button to complete the application registering.
Here are the list of fields in the register form:
| Field | Description | Required | |
|---|---|---|---|
| Name | The application name | Yes | |
| Kind | The application kind. Select one of these values: Kubernetes, Terraform, CloudRun, Lambda and ECS. |
Yes | |
| Piped | The piped that handles this application. Select one of the registered pipeds at Settings/Piped page. |
Yes | |
| Repository | The Git repository contains application configuration and application configuration. Select one of the registered repositories in piped configuration. |
Yes | |
| Path | The relative path from the root of the Git repository to the directory containing application configuration and application configuration. Use ./ means repository root. |
Yes | |
| Config Filename | The name of application configuration file. Default is app.pipecd.yaml. |
No | |
| Platform Provider | Where the application will be deployed to. Select one of the registered cloud/platform providers in piped configuration. This field name previously was Cloud Provider. |
Yes |
Note: Labels couldn’t be set via this form. If you want, try the way to register via the application configuration defined in the Git repository.
After submitting the form, one more step left is adding the application configuration file for that application into the application directory in Git repository same as we prepared in the above method.
Please refer Define your app’s configuration or pipecd/examples for the examples of being supported application kind.
Updating an application
Regardless of which method you used to register the application, the web console can only be used to disable/enable/delete the application, besides the adding operation. All updates on application information must be done via the application configuration file stored in Git as a single source of truth.
apiVersion: pipecd.dev/v1beta1
kind: AppKind
spec:
  name: new-name
  labels:
    team: new-team
Refer to configuration reference to see the full list of configurable fields.
Feedback
Was this page helpful?
Glad to hear it! Please tell us how we can improve.
Sorry to hear that. Please tell us how we can improve.