Installing Control Plane on Kubernetes
Prerequisites
- A running Kubernetes cluster
- Installed Helm (3.8.0 or later)
Installation
1. Preparing an encryption key
PipeCD requires a key for encrypting sensitive data or signing JWT tokens while authenticating. You can use one of the following commands to generate an encryption key.
openssl rand 64 | base64 > encryption-key

# or
cat /dev/urandom | head -c64 | base64 > encryption-key
2. Preparing Control Plane configuration file and installing
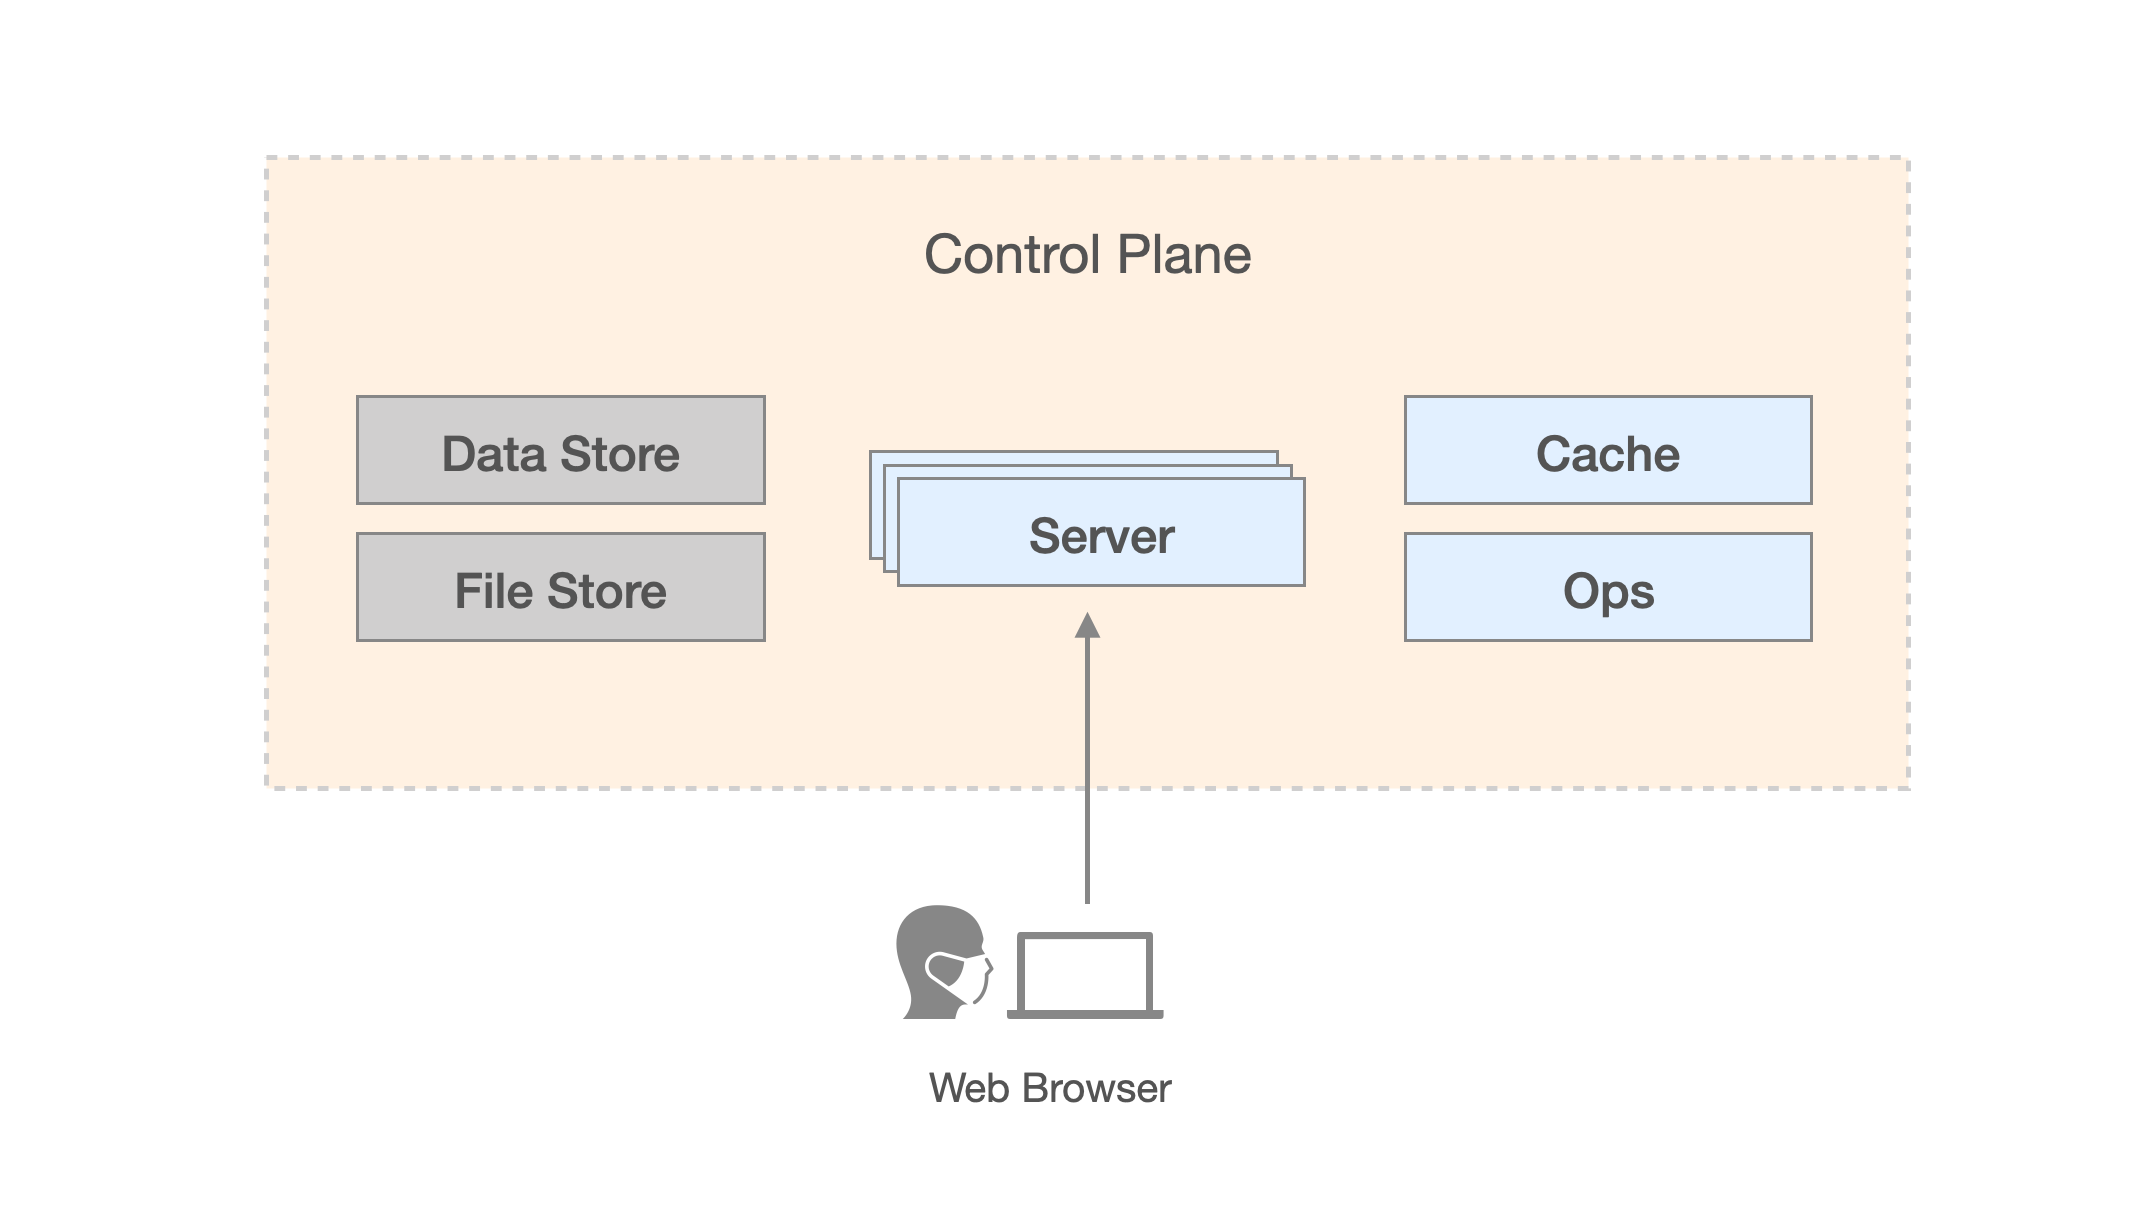
Control Plane Architecture
The Control Plane of PipeCD is constructed by several components, as shown in the above graph (for more details please read Control Plane architecture overview docs). As mentioned in the graph, PipeCD’s data can be stored in one of the provided fully-managed or self-managed services. So you have to decide which kind of data store and file store you want to use and prepare a Control Plane configuration file suitable for that choice.
Using Firestore and GCS
PipeCD requires a GCS bucket and service account files to access Firestore and GCS service. Here is an example configuration file:
apiVersion: "pipecd.dev/v1beta1"
kind: ControlPlane
spec:
  stateKey: {RANDOM_STRING}
  datastore:
    type: FIRESTORE
    config:
      namespace: pipecd
      environment: dev
      project: {YOUR_GCP_PROJECT_NAME}
      # Must be a service account with "Cloud Datastore User" and "Cloud Datastore Index Admin" roles
      # since PipeCD needs them to create the needed Firestore composite indexes in the background.
      credentialsFile: /etc/pipecd-secret/firestore-service-account
  filestore:
    type: GCS
    config:
      bucket: {YOUR_BUCKET_NAME}
      # Must be a service account with "Storage Object Admin (roles/storage.objectAdmin)" role on the given bucket
      # since PipeCD needs to write file objects such as deployment log files to that bucket.
      credentialsFile: /etc/pipecd-secret/gcs-service-account
See Configuration reference for the full configuration.
After all, install the Control Plane as below:
helm upgrade -i pipecd oci://ghcr.io/pipe-cd/chart/pipecd --version v0.55.0 --namespace={NAMESPACE} \
  --set-file config.data=path-to-control-plane-configuration-file \
  --set-file secret.encryptionKey.data=path-to-encryption-key-file \
  --set-file secret.firestoreServiceAccount.data=path-to-service-account-file \
  --set-file secret.gcsServiceAccount.data=path-to-service-account-file
Currently, besides Firestore PipeCD supports other databases as its datastore such as MySQL. As for filestore, PipeCD supports AWS S3 and MINIO as well.
For example, in case of using MySQL as datastore and MINIO as filestore, the Control Plane configuration will be as follows:
apiVersion: "pipecd.dev/v1beta1"
kind: ControlPlane
spec:
  stateKey: {RANDOM_STRING}
  datastore:
    type: MYSQL
    config:
      url: {YOUR_MYSQL_ADDRESS}
      database: {YOUR_DATABASE_NAME}
  filestore:
    type: MINIO
    config:
      endpoint: {YOUR_MINIO_ADDRESS}
      bucket: {YOUR_BUCKET_NAME}
      accessKeyFile: /etc/pipecd-secret/minio-access-key
      secretKeyFile: /etc/pipecd-secret/minio-secret-key
      autoCreateBucket: true
You can find required configurations to use other datastores and filestores from Configuration reference.
Caution: In case of using MySQL as Control Plane’s datastore, please note that the implementation of PipeCD requires some features that are only available in MySQL v8, make sure your MySQL service satisfies the requirement.
3. Accessing the PipeCD web
If your installation includes an ingress, the PipeCD web can be accessed by the ingress’s IP address or domain.
Otherwise, private PipeCD web can be accessed by using kubectl port-forward to expose the installed Control Plane on your localhost:
kubectl port-forward svc/pipecd 8080 --namespace={NAMESPACE}
Now go to http://localhost:8080 on your browser, you will see a page to log in to your project.
Up to here, you have an installed PipeCD’s Control Plane. To log in, you need to initialize a new project.
4. Initialize a new project
To create a new project, you need to access the ops pod in your installed PipeCD control plane, using kubectl port-forward command:
kubectl port-forward service/pipecd-ops 9082 --namespace={NAMESPACE}
Then, access http://localhost:9082.
On that page, you will see the list of registered projects and a link to register new projects. Registering a new project requires only a unique ID string and an optional description text.
Once a new project has been registered, a static admin (username, password) will be automatically generated for the project admin, you can use that to log in via the login form in the above section.
For more about adding a new project in detail, please read the following docs.
4’. Upgrade Control Plane version
To upgrade the PipeCD Control Plane, preparations and commands remain as you do when installing PipeCD Control Plane. You only need to change the version flag in command to the specified version you want to upgrade your PipeCD Control Plane to.
helm upgrade -i pipecd oci://ghcr.io/pipe-cd/chart/pipecd --version {NEW_VERSION} --namespace={NAMESPACE} \
  --set-file config.data=path-to-control-plane-configuration-file \
  --set-file secret.encryptionKey.data=path-to-encryption-key-file \
  --set-file secret.firestoreServiceAccount.data=path-to-service-account-file \
  --set-file secret.gcsServiceAccount.data=path-to-service-account-file
Production Hardening
This part provides guidance for a production hardened deployment of the control plane.
-
Publishing the control plane
You can allow external access to the control plane by enabling the ingress configuration.
-
End-to-End TLS
After switching to HTTPS, do not forget to set the
api.args.secureCookieparameter to betrueto disallow using cookies on unsecured HTTP connection.Alternatively in the case of GKE Ingress, PipeCD also requires a TLS certificate for internal use. This can be a self-signed one and generated by this command:
openssl req -x509 -nodes -days 3650 -newkey rsa:2048 -keyout tls.key -out tls.crt -subj "/CN={YOUR_DOMAIN}"Those key and cert can be configured via
secret.internalTLSKey.dataandsecret.internalTLSCert.data.To enable internal TLS connection, please set the
gateway.internalTLS.enabledparameter to betrue.Otherwise, the
cloud.google.com/app-protocolsannotation should also be configured as the following:service: port: 443 annotations: cloud.google.com/app-protocols: '{"service":"HTTP2"}'
Feedback
Was this page helpful?
Glad to hear it! Please tell us how we can improve.
Sorry to hear that. Please tell us how we can improve.