Your First GitOps Project with PipeCD
Categories:
Introduction
 Every infrastructure setup tends to follow the same pattern. You open the AWS console, configure a few options, and create a resource. It works as expected. But when the same setup needs to be recreated later, there is no clear record of what was done. The process becomes manual again, often inconsistent, and difficult to repeat reliably. This is the gap that Git-based workflows aim to address.
In this guide, we build a complete deployment pipeline using PipeCD and Terraform, where infrastructure is defined in a repository and automatically applied to AWS. Instead of focusing only on the steps, this walkthrough explains what each command does, how the components interact, and how the system behaves during a deployment.
The objective is straightforward: move infrastructure management from manual execution to a system-driven process.
What is GitOps ?
At its core, GitOps is a way of managing infrastructure using Git as the source of truth.
Instead of creating or modifying resources manually, everything is defined in code and stored in a repository. Any change to infrastructure starts as a commit. That change is then picked up by a system, which applies it to the actual environment. You are no longer relying on memory or manual steps. The system continuously compares what exists in the cloud with what is defined in Git and makes sure both stay in sync. if something drifts, it gets corrected. If something changes in Git, it gets applied.
PipeCD Overview
PipeCD is a CNCF based Open Source Project with continuous delivery system that separates orchestration from execution.
The control plane provides the interface and manages deployment state, while the Piped agent runs inside the Kubernetes cluster and performs the actual deployment tasks. In this project, PipeCD is configured to execute Terraform for provisioning AWS infrastructure.
What We Are Building ? (Architecture)
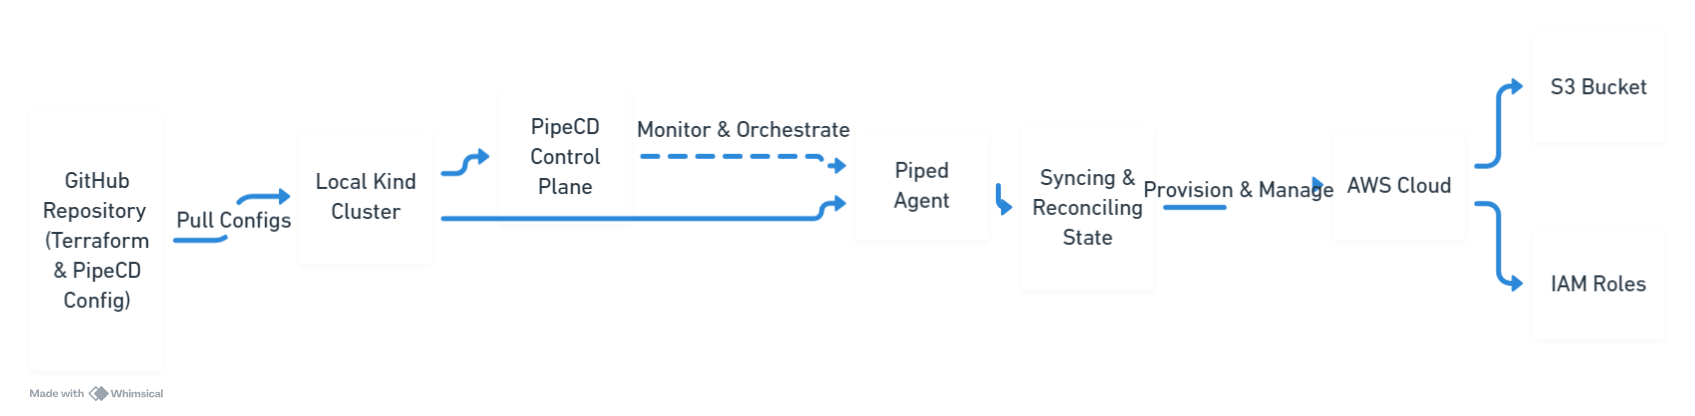
We are building a pipeline that connects GitHub, PipeCD, Terraform, and AWS. So how does a simple commit actually turn into a real resource in AWS?
Here’s how, A change pushed to GitHub is detected by PipeCD. The control plane coordinates the deployment, and the Piped agent executes Terraform inside the Kubernetes cluster. Terraform then provisions infrastructure in AWS, in this case an S3 bucket.
This flow ensures that the state defined in Git is continuously applied to the target environment. The goal is simple: make the system responsible for deployments, not the developer.
Step 1: Creating the Kubernetes Cluster
kind create cluster --name pipecd-demo
kubectl get nodes
The first command creates a Kubernetes cluster named pipecd-demo using Kind. The second command verifies that the cluster is running by listing the available nodes. This cluster will host the PipeCD components.
Step 2: Installing PipeCD Control Plane
kubectl apply -n pipecd -f https://raw.githubusercontent.com/pipe-cd/pipecd/master/quickstart/manifests/control-plane.yaml
A namespace named pipecd is created to isolate the components. The manifest is then applied, which deploys the PipeCD control plane, including its API server and UI, into the cluster.
Step 3: Accessing the PipeCD UI
kubectl port-forward -n pipecd svc/pipecd 8080:8080
This command forwards traffic from port 8080 on your local machine to the PipeCD service inside the cluster. It allows access to the PipeCD web interface through a browser.
Step 4: Registering the Piped Agent
curl -s https://raw.githubusercontent.com/pipe-cd/pipecd/master/quickstart/manifests/piped.yaml | \
sed -e 's/<YOUR_PIPED_ID>/PASTE_ID_HERE/g' \
-e 's/<YOUR_PIPED_KEY_DATA>/PASTE_BASE64_KEY_HERE/g' | \
kubectl apply -n pipecd -f -
This command downloads the Piped agent manifest, replaces placeholder values with the actual Piped ID and key, and applies it to the cluster. Once deployed, the agent connects to the control plane and becomes responsible for executing deployments.
Step 5: Configuring Repository and Provider
kubectl apply -f - <<EOF
apiVersion: v1
kind: ConfigMap
metadata:
  name: piped
  namespace: pipecd
data:
  piped-config.yaml: |-
    apiVersion: pipecd.dev/v1beta1
    kind: Piped
    spec:
      projectID: quickstart
      pipedID: YOUR_ID_HERE
      pipedKeyData: YOUR_KEY_HERE
      apiAddress: pipecd:8080
      repositories:
        - repoId: aws-demo-repo
          remote: https://github.com/YOUR_USERNAME/pipecd-aws-demo.git
          branch: main
      cloudProviders:
        - name: aws-terraform
          type: TERRAFORM
          config: {}
EOF
This configuration defines how the Piped agent interacts with external systems. It registers the GitHub repository, specifies the branch to monitor, and configures Terraform as the deployment platform.
Step 6: Providing AWS Credentials
kubectl set env deployment/piped -n pipecd \
  AWS_ACCESS_KEY_ID="..." \
  AWS_SECRET_ACCESS_KEY="..."

kubectl rollout restart deployment piped -n pipecd
Environment variables are injected into the Piped deployment to provide AWS credentials. These credentials are required by Terraform to authenticate and create resources. The deployment is then restarted so the changes take effect.
Step 7: Defining the Application
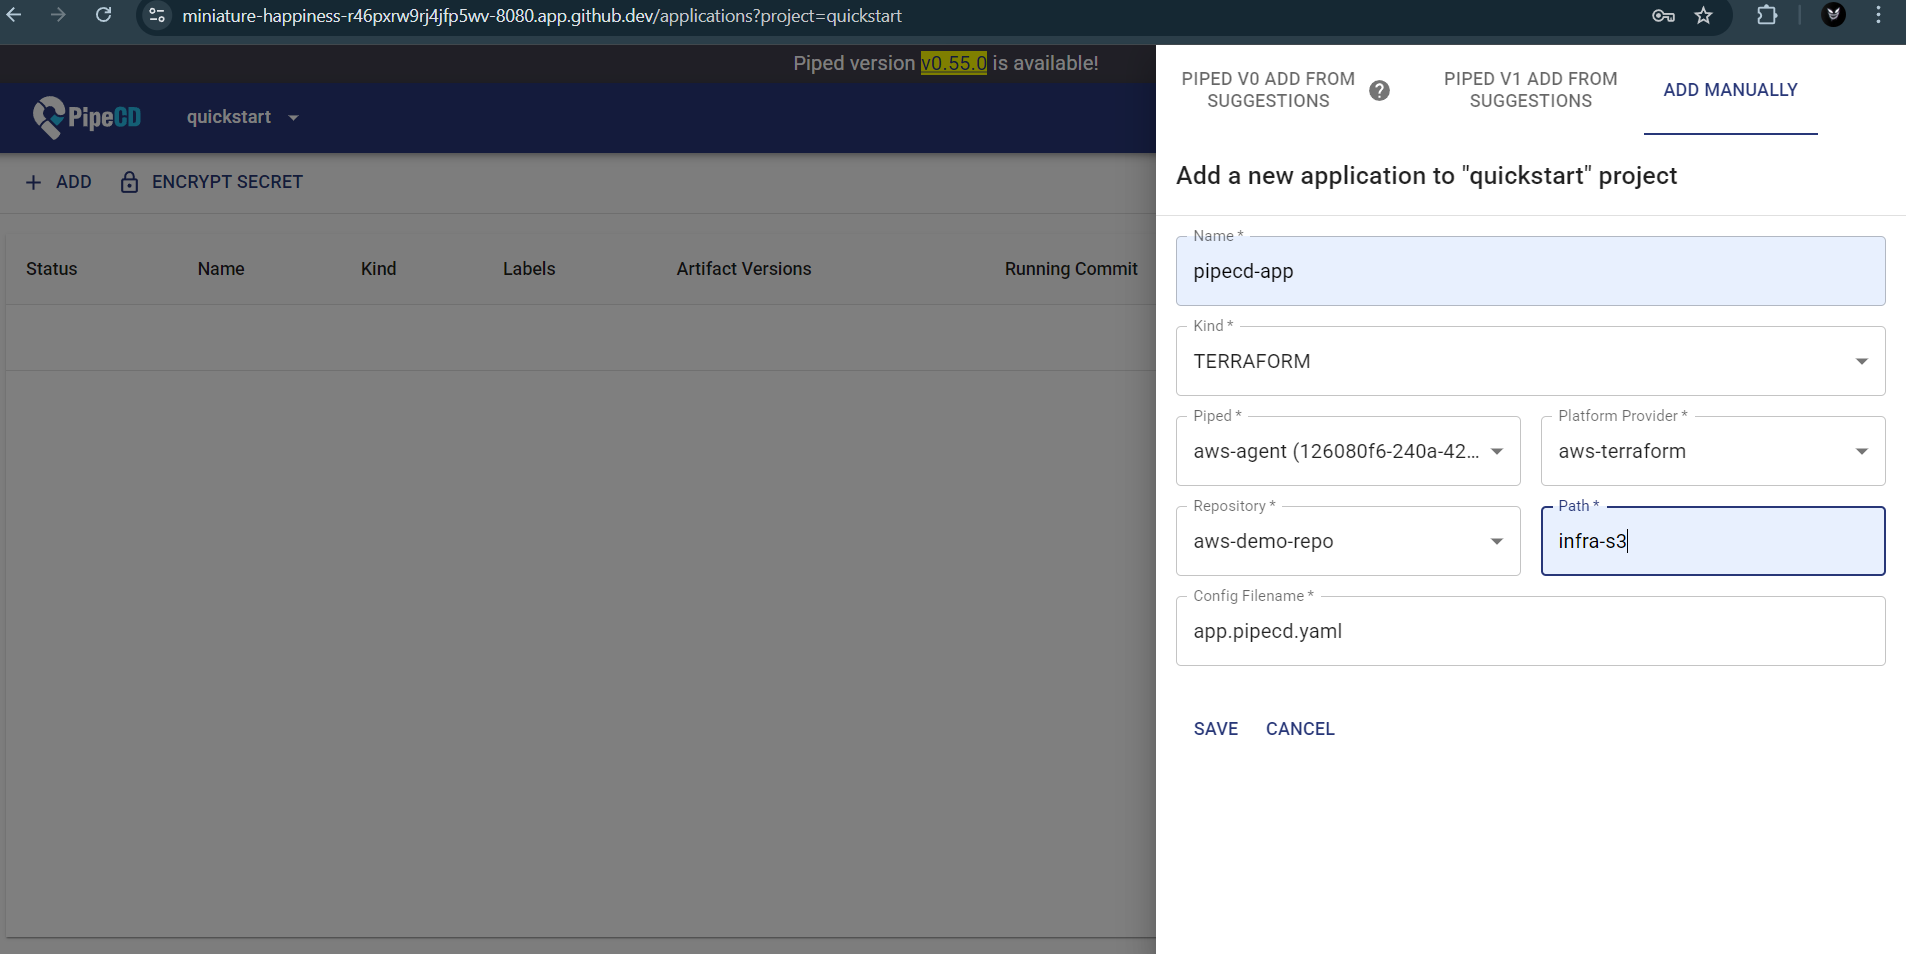
The application is registered in the PipeCD UI with the following configuration:
- Kind: Terraform
- Platform Provider: aws-terraform
- Path: infra-s3
- Config File: app.pipecd.yaml
The path must match the repository structure exactly. Any mismatch, including trailing spaces, will prevent PipeCD from locating the configuration. One extra space here can break everything. Not a missing config. Not a wrong key. A space.
Step 8: Terraform Configuration
The infra-s3 directory contains Terraform code that defines the S3 bucket. The app.pipecd.yaml file tells PipeCD how to execute this configuration.
When PipeCD detects a change, it triggers Terraform through the Piped agent, ensuring that the defined infrastructure state is applied.
Deployment and Result
Once the setup is complete, triggering a sync in PipeCD starts the deployment process. The control plane schedules the deployment, and the Piped agent executes Terraform within the cluster.
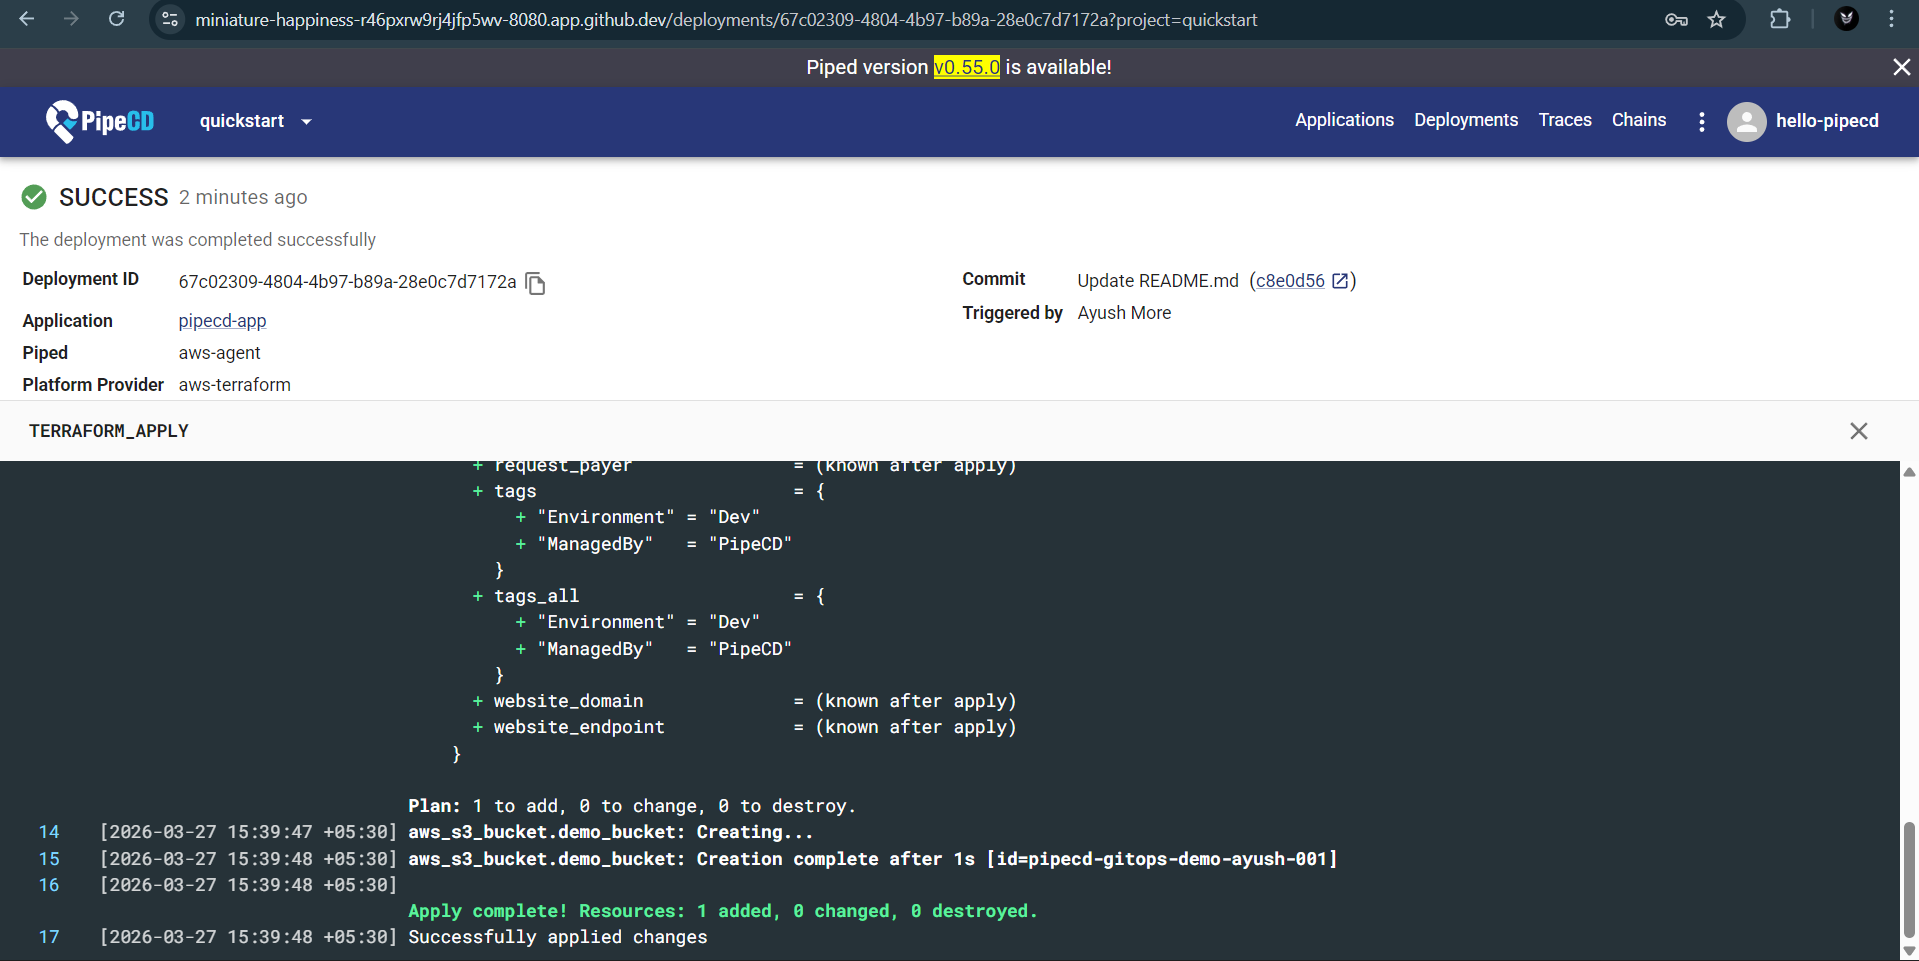
During execution, Terraform evaluates the configuration and applies the required changes. A successful run ends with:
Apply complete!
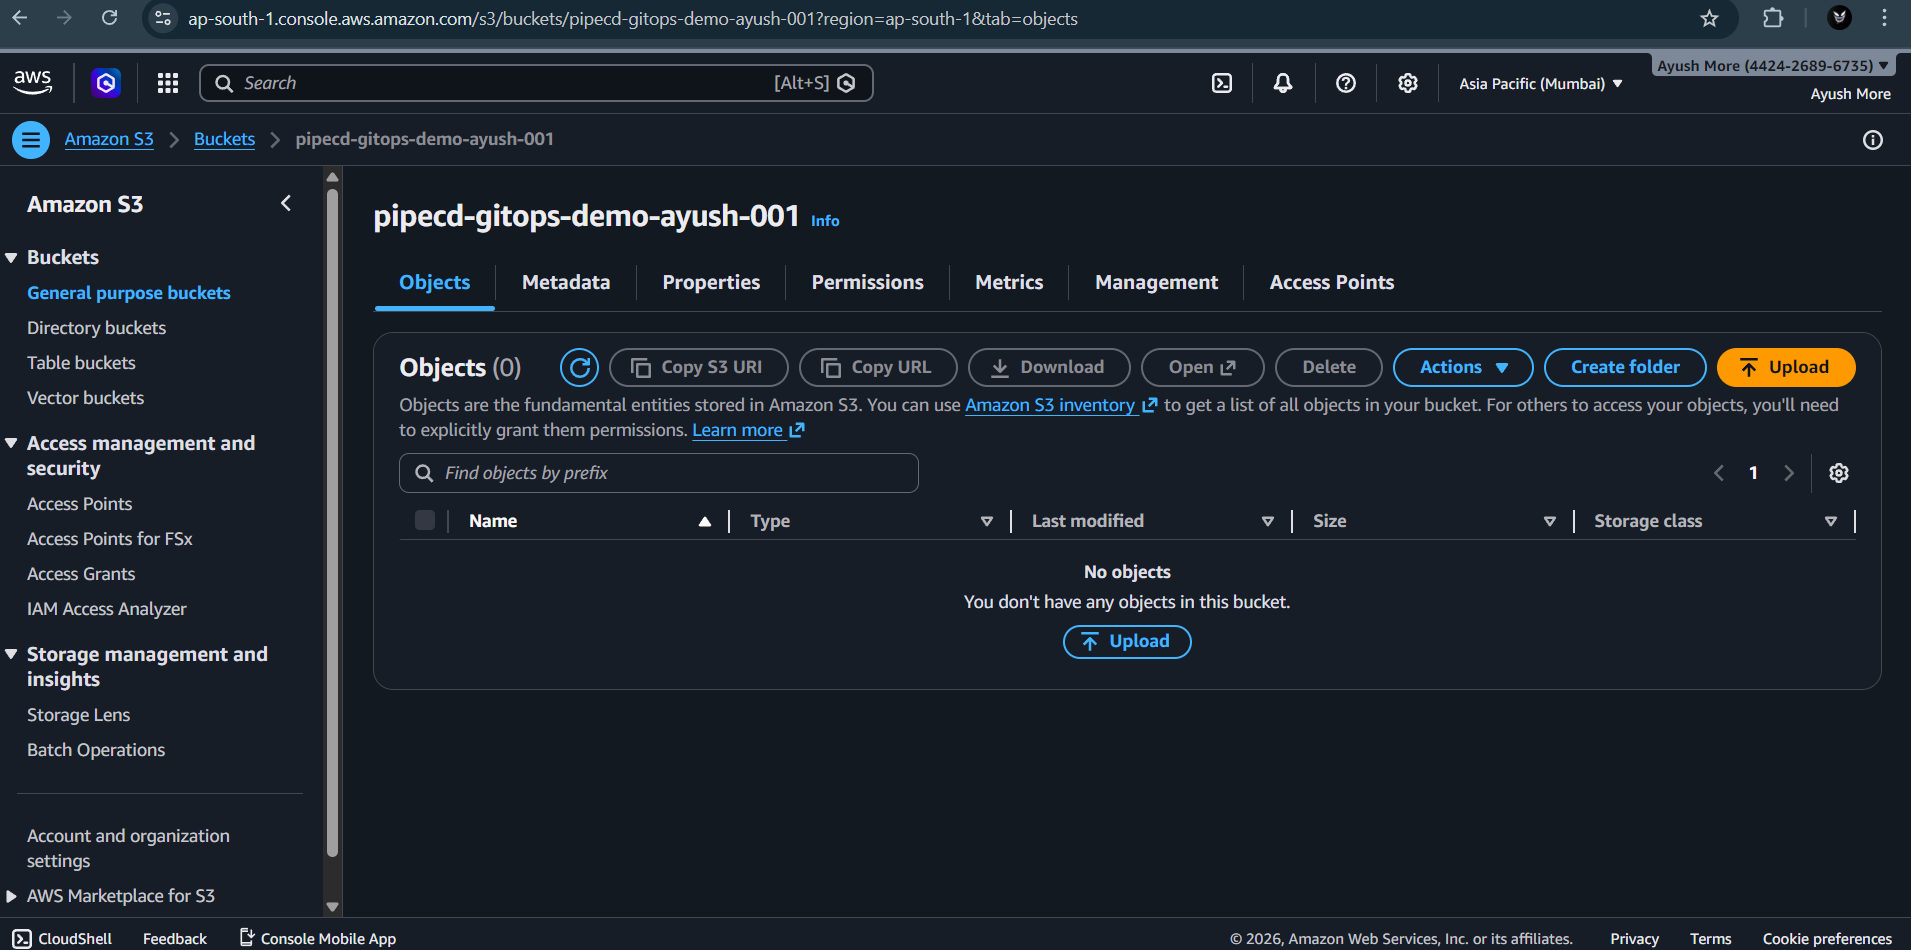
At this point, the S3 bucket defined in the repository is created in AWS. The infrastructure now reflects the state declared in Git, with no manual interaction required in the AWS console. That line does a lot of work. It replaces about 15 manual clicks and at least one moment of confusion in the AWS console.
What We Built ?
This setup results in a complete GitOps workflow where infrastructure is managed entirely through code. A local Kubernetes cluster runs PipeCD, which continuously monitors a Git repository. The Piped agent executes Terraform to apply changes to AWS, ensuring that the deployed infrastructure always reflects the state defined in Git.
Once configured, the system removes the need for manual interaction with the AWS console. Changes are introduced through commits, reviewed through Git, and applied automatically through the deployment pipeline.
While this implementation focuses on a single S3 resource, the same approach can be extended to larger and more complex systems. The underlying idea remains consistent. Infrastructure is no longer configured manually but defined, versioned, and deployed through a controlled workflow.
The shift is subtle but important. The responsibility moves from the individual executing commands to the system enforcing consistency.
Join the PipeCD Community
The shift toward GitOps is subtle but important. The responsibility moves from the individual executing commands to the system enforcing consistency. Whether you are managing a single S3 bucket or a massive multi-cloud infrastructure, PipeCD provides the guardrails to ship fast with confidence.
Take the Next Step
The best way to learn is by doing: If you want to understand how this works in practice, the best approach is to run it yourself. Clone the repository, go through the setup, and observe how each component behaves. Try modifying the configuration and see how PipeCD reacts. Small experiments make the system much easier to understand, and do not forget to star the repo! If you are getting started with open source, PipeCD is a good project to explore. Even small contributions, like improving documentation or fixing minor issues, can help you understand how real-world systems are built and maintained.
- Fork the Demo: Start your own journey with the pipecd-aws-demo repository—and don’t forget to star it if it helps you!
- Contribute: If you’re getting started with open source, PipeCD is the perfect place to grow. Whether it’s improving documentation, fixing bugs, or suggesting features, your contributions help build the future of GitOps.
- Connect: Join our Slack community to discuss improvements, ask questions, or just say hi.
This post was originally published on Ayush More’s Blog.